Import from a Palantir file
Note: During imports, XEF files containing any special character will be rejected. One allowed exception is the ampersand character (&) in module names; '&' in names is converted to '&' during Export to Palantir File, and the reverse conversion is applied during Palantir Import File.
Import from a Palantir Import File:
- Go to File > Import and select Palantir Import File.
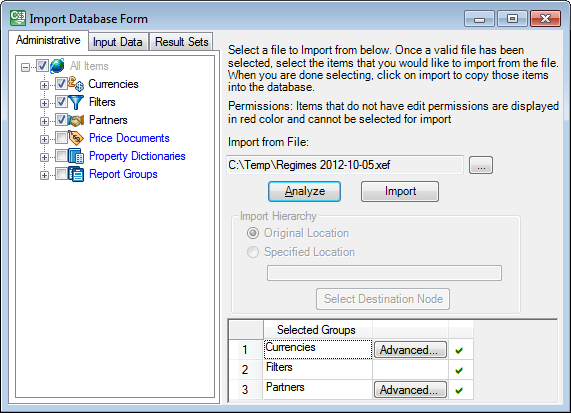
- The Import Wizard will be displayed. It includes three tabs: Administrative, Input Data and Result Sets.
- Select the file you want to import by clicking on
in the Import from file field. The list of items available for import will be displayed in the tabs in the tree view under the All Items node.

- Select the items you want to import by checking boxes next to their names.
- If you import hierarchies, you can select their destination node in the Import Hierarchy section. If you select the Original Location option, the imported hierarchy will take the same place in the destination database as it occupied in the source database. If you select the Specified Location option and select a node by clicking on the Select Destination Node button, the imported hierarchy will be inserted into the selected node.
- To see the differences between items to be imported and existing items, click on the Analyze button. The system will run a comparison and display the results in the Selected Groups table at the bottom of the Wizard window. The table contains one entry per each group of items selected for comparison.
-
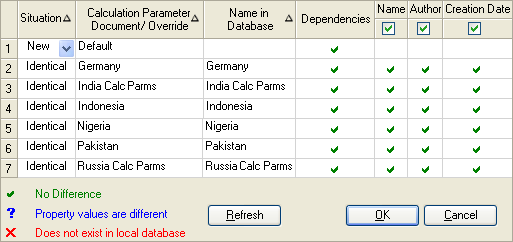
To view the comparison results, click on the Advanced button, and the table shown below will be displayed.
The Situation column shows if the data in the import file are different from the data in the database. If an item exists in the import file but not in the database, a menu will be displayed. You can select one of two options: New (a new entry for the imported item will be created in the database) or Map (imported item will overwrite an existing entry in the database). If you select Map, a drop-down list of database items will be displayed in the Name in Database field.
The Name in Database column displays names of items which exist in the database. In the example above, the system identified most of Calculation Parameters documents as existing in the database and showed their database names.
If you double-click on a cell in the Dependencies column, you will see the list of items which are linked to the selected item and whether they exist in the database.
The rest of the columns represent various item properties (in this case, they are name, author and creation date). If you do not want to overwrite properties existing in the database with the properties from the import file, uncheck the box at the very top of the column.
- Click the Import button. When the import finishes successfully, a confirmation message will be displayed. The imported data will now become available in the current database.
